Image Library
All images used on network maps, rack views, chassis views, or as object icons must be uploaded to the Image Library first. Images can be uploaded, updated, deleted, and organized in categories.
Managing Images
The Image Library is accessible from the Configuration perspective. Managing images requires the Manage Image Library system access right.
Uploading Images
To upload a new image:
-
Open the Image Library view.
-
Select Upload new image… from the context menu or toolbar.
-
Select the image file.
-
Enter a name and category for the image.
Supported image formats:
-
PNG (.png)
-
JPEG (.jpg, .jpeg)
-
BMP (.bmp)
-
GIF (.gif)
-
ICO (.ico)
-
TIFF (.tif, .tiff)
-
SVG (.svg) — rasterized at the sizes needed for display
Each image must have a unique combination of name and category. The category is free text; existing categories are offered in the drop-down list.
Editing Images
To update an existing image, double-click it in the library or right-click and select Edit. You can change the image name, category, and replace the image file.
Protected images (built-in defaults) cannot be modified or deleted.
Image Library View
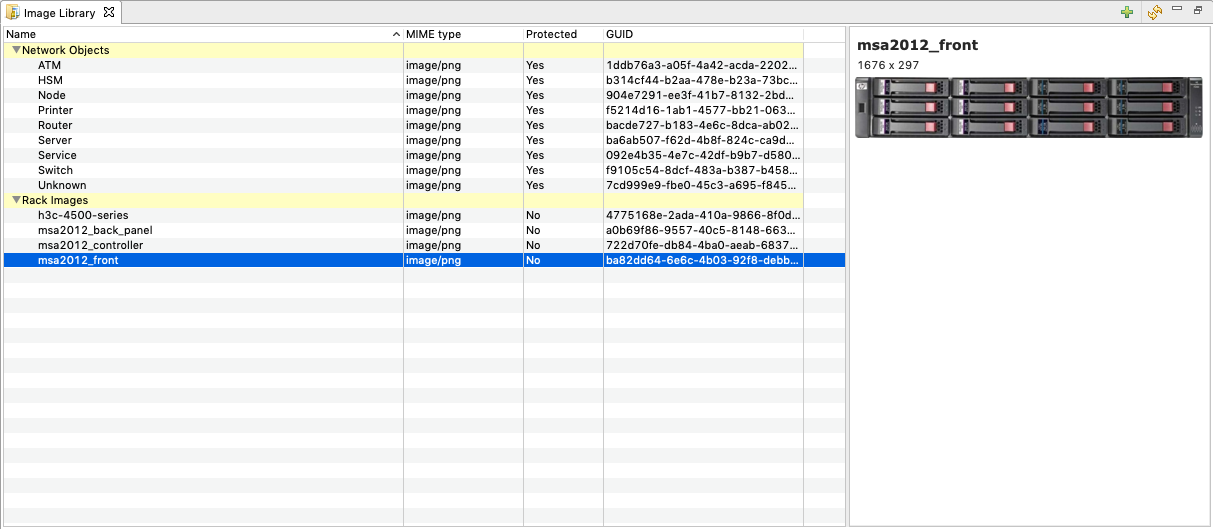
The Image Library view displays images in a tree structure organized by category. The following columns are shown:
| Column | Description |
|---|---|
Name |
Image name. |
MIME type |
Image format (e.g., image/png). |
Protected |
Whether the image is a built-in default that cannot be deleted. |
GUID |
Unique identifier for the image. |
Selecting an image shows a preview panel displaying the image name, dimensions (width x height in pixels), and a thumbnail.
Built-in Default Images
NetXMS includes a set of built-in images in the "Network Objects" category. These are used as default icons for object types and are protected from deletion:
-
ATM
-
HSM
-
Node
-
Printer
-
Router
-
Server
-
Service
-
Switch
-
Unknown
Where Images Are Used
When an image in the library is updated, open views that use it — network maps, rack views, chassis views, object icons — refresh automatically.
Network Maps
Images can be used as map background images or as custom icons for map objects. Select an image from the library using the image selector in the map object properties or map background settings.
| Images used as map object or decoration icons are displayed without scaling. Upload them at the intended display size for best results. Background images can be scaled using the map’s background scaling modes. |
Rack Views
Images represent physical equipment in rack visualizations. Set the image for a rack-mounted object in the object’s properties under the physical placement settings.
DCI Image Rules
Images can be assigned to DCI display rules to show visual indicators based on metric values.
Object Icons
Custom object icons are assigned through object categories: each object category carries a UI icon and a default map image, both selected from the Image Library. Assigning a category to an object replaces its default icon in the object tree; there is no per-object icon selection. Object icons are resized to 16x16 pixels for display.