Network Discovery
NetXMS can automatically discover devices on your network and create corresponding node objects. Discovery reduces the manual effort of adding nodes and helps keep the monitored infrastructure current as new devices appear.
Discovery Flow
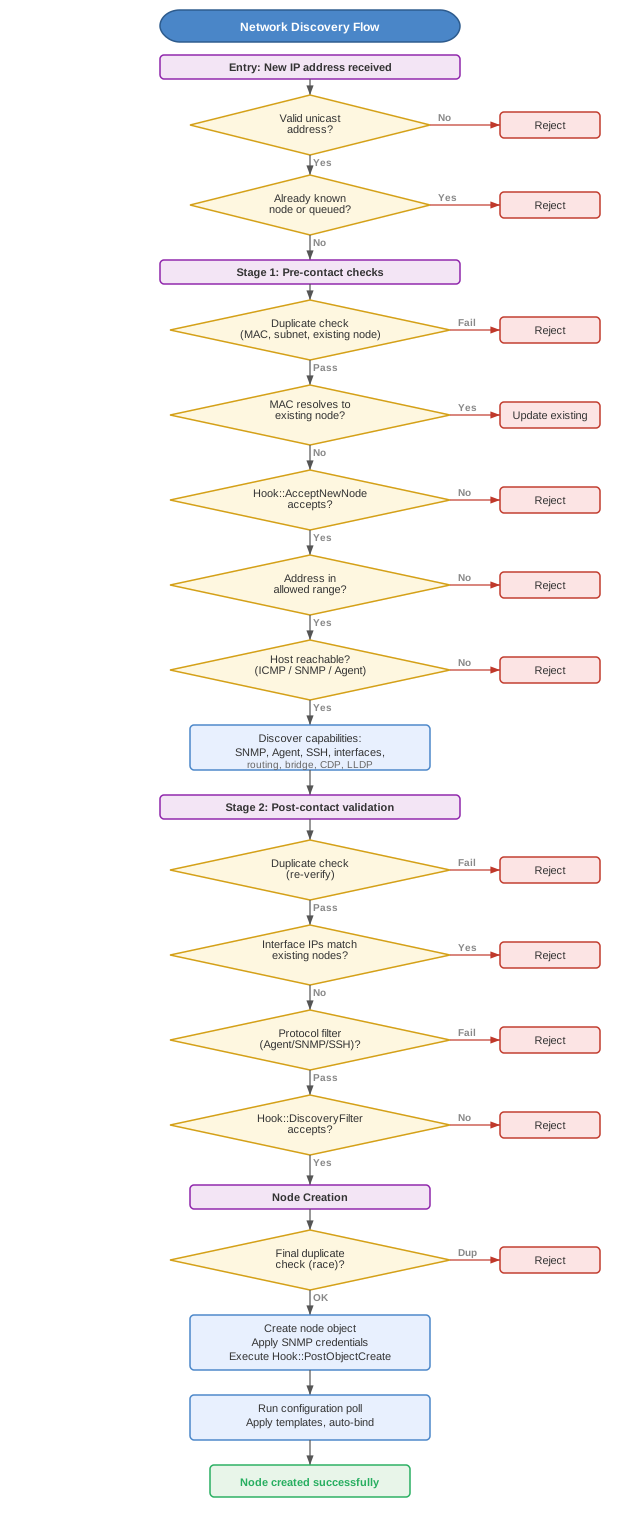
The following diagram shows the complete discovery process from the moment a new IP address is detected to node creation.
Discovery Methods
NetXMS supports two complementary discovery methods that can be used independently or together.
Passive Discovery
Passive discovery finds new nodes by examining information collected from already-monitored devices:
-
ARP caches — collected via SNMP from switches and routers
-
Routing tables — collected via SNMP or agent from routers
When a previously unknown IP address appears in any of these tables, the server probes it (ICMP echo request, agent connection on well-known ports, SNMP and SSH probes), checks it against the discovery filter and, if accepted, creates a new node object.
Passive discovery does not scan address ranges, but every candidate address is actively probed before a node is created.
Active Discovery
Active discovery supplements passive methods by scanning configured IP address ranges.
By default, the scan uses ICMP echo requests (pings) and SNMP probes.
TCP probing to specific ports (e.g., SSH, agent) can also be enabled via the NetworkDiscovery.ActiveDiscovery.EnableTCPProbing server configuration variable.
Any address that responds to any of the enabled probes and passes the discovery filter is added as a new node.
Active discovery is useful for finding devices that are not visible in neighbor tables — for example, quiet devices that do not communicate with other monitored hosts, devices in isolated subnets, or hosts behind unmanaged routers.
Additional Discovery Sources
Besides passive and active methods, NetXMS can discover nodes from:
-
SNMP trap source addresses — when a trap arrives from an unknown address
-
Syslog source addresses — when a syslog message arrives from an unknown address
-
Agent registration — when an agent announces itself to the server (controlled by the
Agent.EnableRegistrationserver configuration variable); nodes created this way bypass discovery filters
Trap and syslog sources are enabled independently in the discovery configuration.
Configuring Discovery
Enabling Discovery
Open Configuration > Network discovery in the management client. The General section contains the following settings:
| Setting | Description |
|---|---|
Discovery mode |
Disabled, Passive only, Active only, or Active and passive. |
Use SNMP trap source addresses for discovery |
Create nodes from SNMP trap source addresses. |
Use syslog source addresses for discovery |
Create nodes from syslog message source addresses. |
Active Discovery Targets
When active discovery is enabled, configure one or more address ranges to scan:
-
In the Active discovery targets section, click Add…
-
Select Subnet (network address and mask) or Address range (start and end addresses)
-
Optionally select a zone and proxy node for the range, and add a comment
The scan schedule is common for all ranges and is set in the Schedule section: either an interval or a cron expression (server configuration variables NetworkDiscovery.ActiveDiscovery.Interval and NetworkDiscovery.ActiveDiscovery.Schedule).
| Start with small, well-known subnets and expand gradually. Scanning large ranges generates significant ICMP traffic and takes time to complete. |
Address Filter
The Filter section provides a By address range option with an address list. When enabled, only addresses matching an entry in the list are accepted for discovery; all other addresses are silently ignored. There is no separate exclusion list — to keep an address range out of discovery, simply do not include it in the list.
Each list entry is either a subnet (network address and mask) or an address range (start and end addresses), with an optional comment.
Discovery Filter
The discovery process supports two hook scripts for filtering, executed at different stages (see the flow diagram above):
-
Hook::AcceptNewNode — runs in Stage 1, before the host is contacted. Only has IP and MAC address information. See Hook::AcceptNewNode reference.
-
Hook::DiscoveryFilter — runs in Stage 2, after capabilities are discovered. Receives a
DiscoveredNodeobject with full device details (SNMP, agent, interfaces, etc.). See Hook::DiscoveryFilter reference.
Both scripts must return true to accept the discovered node; returning false (or a script runtime error) rejects it.
Additionally, protocol filters (Agent, SNMP, SSH) can be configured in the discovery settings GUI without writing scripts.
Filter Examples
Hook::AcceptNewNode (Stage 1)
subnet1 = InetAddress("10.0.0.0", 8);
subnet2 = InetAddress("172.16.0.0", 12);
addr = InetAddress($ipAddr);
return subnet1.contains(addr) || subnet2.contains(addr);
Hook::DiscoveryFilter (Stage 2)
return $node.isSNMP || $node.isAgent;if ($snmp != null)
{
sysDescr = $snmp.getValue("1.3.6.1.2.1.1.1.0");
if (sysDescr ~= "(?i)printer|laserjet|xerox|ricoh")
return false;
}
return true;if ($node.isAgent)
return true;
if ($node.isSNMP)
{
sysDescr = $snmp.getValue("1.3.6.1.2.1.1.1.0");
if (sysDescr ~= "(?i)router|cisco|juniper")
return true;
}
return false;Post-Discovery Actions
After a node is created through discovery, the server automatically:
-
Executes Hook::PostObjectCreate if configured (see Server Hooks)
-
Runs a forced configuration poll to detect interfaces, capabilities, and supported protocols; during the poll the server:
-
Executes Hook::ConfigurationPoll if configured
-
Applies auto-apply templates whose filter scripts match the new node
-
Binds the node to containers whose auto-bind rules match
-
-
Generates the SYS_NODE_ADDED event
Credential and Configuration Setup
During discovery, the server automatically applies credentials and configuration from centrally managed settings:
-
SNMP credentials — the server probes the discovered address using SNMP community strings and SNMPv3 USM credentials from the credential store (configured in Configuration perspective, per zone or globally). The working credentials are passed to the new node object.
-
Agent shared secret — if agent authentication is required, the server tries shared secrets from the credential store during the configuration poll. The working secret is stored on the node.
-
Interface expected state — interfaces created during configuration poll receive the default expected state configured by the
Objects.Interfaces.DefaultExpectedStateserver configuration variable.
Discovery Configuration Variables
For a complete list of server configuration variables that control discovery behavior, see Network Discovery Reference.
Seed Nodes
For passive discovery to work, at least one node must already exist in the system. These initial nodes (called "seed nodes") provide the neighbor data that starts the discovery chain.
Typical seed node choices:
-
Core routers or Layer 3 switches — have the largest ARP/routing tables
-
Distribution layer switches — see traffic from many subnets
-
DNS servers — accessible from most network segments
After creating seed nodes manually, passive discovery expands outward as each newly discovered node contributes its own neighbor tables.
Monitoring Discovery Status
The discovery process can be monitored from:
-
Server log — search for
poll.discoveryentries -
Internal DCI —
Server.QueueSize.Current(NodeDiscoveryPoller)shows the number of addresses awaiting processing (.Average,.Max, and.Minvariants are also available) -
Event log — event
SYS_NODE_ADDEDis generated for each node created via discovery
Troubleshooting Discovery
If expected nodes are not being discovered:
-
Verify discovery is enabled: Configuration > Network discovery, General section
-
Check seed nodes have SNMP access to populate neighbor tables
-
If the By address range filter is enabled, verify the address matches one of the list entries
-
Check the discovery filter script (if configured) accepts the address
-
Verify network connectivity from the server to the target address
-
Check the discovery queue: if
Server.QueueSize.Current(NodeDiscoveryPoller)is high, the server may be backlogged -
Enable debug logging: set the
poll.discoverydebug tag to level 6 (see Enabling Debug Logging)